MVP Release - Our Findings So Far
Table of Contents
- Introduction
- Installation Guide
- Getting To Know the Hardware
- Hello World Test
- Training the model
- Compiling the model
- Testing the model
Introduction
This document details the setup, compilation, and testing process for running machine learning models on Texas Instruments’ radar.
Installation Guide
- These instructions are for Ubuntu 22.04 LTS either natively or running in WSL2.
- Download the MMWAVE-L-SDK for xWRL6432 from https://www.ti.com/tool/MMWAVE-L-SDK. Install it in
C:/tion Windows or~/tion Ubuntu. - Download SysConfig from https://www.ti.com/tool/SYSCONFIG. Install it in
C:/tion Windows or~/tion Ubuntu. - Download the TI CLANG Compiler Toolchain from https://www.ti.com/tool/TI-CLANG. Install it in
C:/tion Windows or~/tion Ubuntu. - Download and install Python 3.10 from https://www.python.org/downloads/. Make sure to add it to your path.
- Make sure the Python package manager
pipis installed. - Install the packages needed for the flashing tools with
pip install pyserial xmodem tqdm. - Install the packages needed for the model training with
pip install torch pandas scikit-learn torchmetrics matplotlib torchinfo onnx_tool. - If on Ubuntu, install mono runtime with
sudo apt install mono-runtime. - Download Code Composer Studio (CCS) from https://www.ti.com/tool/CCSTUDIO.
- Install CCS by running the installer file after unzipping the package.
- Keep the default installation path.
- Select the component “mmwave” to install xWRL6432 support.
- Launch CCS with the default workspace.
- Go to
Window > Preferences > Code Composer Studio > Productsand make sure SysConfig is listed. - Go to
Window > Preferences > Code Composer Studio > Build > Compilersand make sure TI Clang is listed.
- Install the TVM compiler from a wheel using
pip install ti_tvm-0.16.0-cp310-cp310-linux_x86_64.whll --force-reinstall. - Confirm
tvmcis on the path by runningtvmc --version. - Download the TI cross-compiler for the cortexM4 using
wget https://dr-download.ti.com/software-development/ide-configuration-compiler-ordebugger/MD-ayxs93eZNN/2.1.2.LTS/ti_cgt_armllvm_2.1.2.LTS_linux-x64_installer.bin. - Install the cross-compiler by running
chmod +x ti_cgt_armllvm_2.1.2.LTS_linux-x64_installer.binand then./ti_cgt_armllvm_2.1.2.LTS_linux-x64_installer.bin.
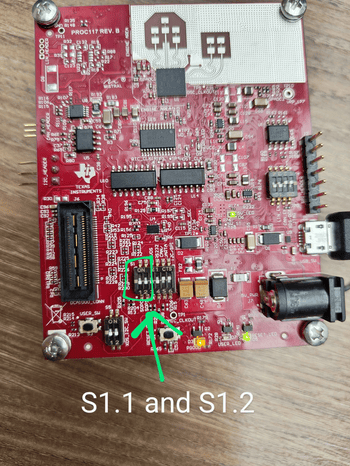
Getting To Know the Hardware
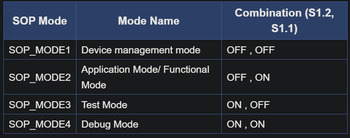
The board has 4 different modes controlled by the switches on the board:
Hello World Test
- Create the target configuration in CCS.
- Open a UART terminal and connect to the board.
- Build the hello world example from the SDK.
- Flash an empty appimage to the board using the visualiser tool.
- Launch the target configuration.
- Load the hello world binary on to the CPU.
- Run the program.
- Flash the program onto the board so it can run without CCS.
Training the Model
- Decide if you’re going to train on the CPU or the GPU. Texas Instruments recommends the CPU as the overhead of copying the data into graphics memory is not worth the speedup.
- Load the data from the provided datasets.
- Preprocess the data by normalising it and turning it into tensors.
- Split the data into training and testing sets.
- Define the model architecture.
- Train the model.
- Export the model to an ONNX file.
Compiling the Model
- Simply, set the options for the TVM compiler commandline tool.
- Then, run the command to compile the model.
- Confirm
devc.o,lib0.c,lib1.c,mod.a, andtvmgen_default.hare generated.
Testing the Model
- Set up board and connect via UART.
- Copy dataset files (
CCS_dry_data.bin,CCS_wet_data.bin) into CSS project. - Modify the CreateFeatureVector function to match the PyTorch flow.
- Test on device and compare results with PyTorch metrics.
- Check accuracy via UART output.
- Benchmark model timing.